 微物联研究院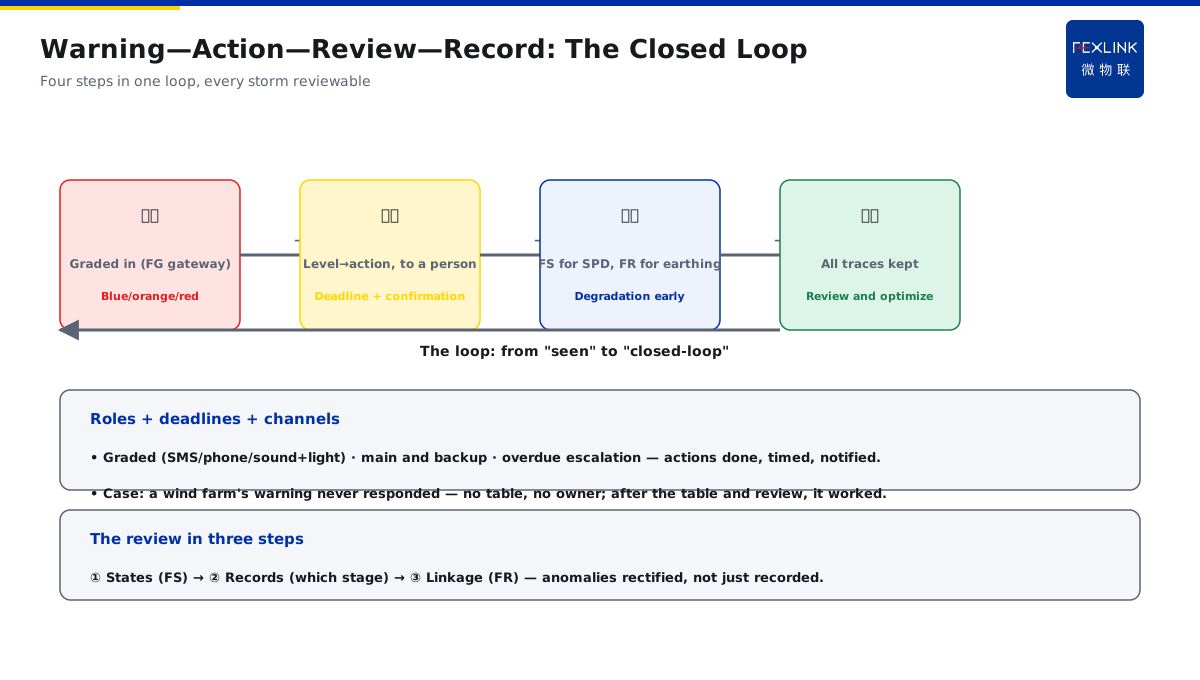
Direct Answer
A lightning early-warning system is installed, the alarms come but nobody knows what to do — how do you make the system actually work? The answer: the value of lightning early warning lies in mapping the graded alarms to concrete actions — blue for preparation, orange for suspending outdoor work at height and checking air termination and earthing, red for stopping outdoor work with SPD/bonding on standby and post-warning re-checks; fix the warning level, responsible person, action deadline and post-review into a workflow, and the warning goes from "seen" to "closed-loop".
At a park, the lightning early-warning system was installed and alarms sounded several times in the storm season, but nobody acted — blue was ignored, orange work continued as usual. Redesign: map the warning levels to an action table, each level with its responsible person, action and deadline, and re-check SPDs and earthing uniformly after the warning. The key distinction: the warning is not "a flash on the screen" but a closed loop of "level → action → responsible person → deadline → review" — the graded warning maps to concrete actions, the actions are fixed into a workflow, and the post-review closes the loop.
Why:
- Grading mapping: blue/orange/red warnings correspond to different actions;
- Scenario differences: outdoor work/unmanned stations/hazardous areas differ;
- Review points: how to check the SPDs/earthing after the warning;
- Closed-loop design: roles, deadlines, notification channels, records.
Key insight: "The warning goes from 'seen' to 'closed-loop' — blue for preparation, orange for stopping work at height, red for stopping outdoor work; the graded mapping to actions, responsible person + deadline + post-review fixed into the workflow."
At a wind farm, the lightning warning was never responded to until a strike damaged the equipment — no graded action table, no responsible person. After adding the action table and the review workflow, the warning was actually used. Lesson: a warning without a loop is as good as not installed — the level, action, responsible person and review are all four required.
Overview: run "warning—action—review" as an executable closed loop. The lightning early-warning system solves only "knowing in advance", not "what to do after knowing" — the latter depends on workflow design. The workflow has four elements: one, the grading mapping (each warning level corresponds to a set of actions); two, the scenario differences (the same level differs across scenarios); three, the review points (how to check the SPDs/earthing after the warning); four, the closed-loop records (who did what within what deadline, how to review after). With all four, the warning goes from "seen" to "closed-loop". The five steps below expand: the grading-to-action mapping table, the scenario differences, the post-warning SPD/earthing review points, the roles/deadlines/notification channels, and the warning—action—record loop.
Why "the alarm sounds but nobody moves": the root cause of a failed warning system is usually not inaccurate alarms but missing workflows. Three typical breaks: one, "level without action" — the alarm only labels the level without stating what to do, so the field can only wait; two, "action without a responsible person" — nobody is assigned, everyone assumes someone else will handle it, and in the end nobody does; three, "action without review" — the storm passes and the SPD degradation and earthing looseness are unchecked, so the next strike damages again. The order of fixing is also these three: build the graded action table first, then assign the responsible persons and deadlines, and finally add the post-review. The three breaks behind "the alarm sounds but nobody moves" are no action, no responsible person and no review — fix in that order, a table first, people then, and a loop last.
1. Step One: The Grading-to-Action Mapping Table
Step one: turn the alarm into actions.
The mapping principle:
- Each warning level corresponds to a set of actions;
- The actions concrete and executable;
- The responsible person and deadline stated;
- Avoiding "I know but I don't know what to do".
The blue/orange/red mapping:
- Blue (warning): prepare — check communications, ready the tools, follow the trend;
- Orange (approaching): suspend outdoor work at height, check air termination and earthing;
- Red (imminent): stop outdoor work, SPD/bonding on standby, re-check after the warning.
The mapping-table example:
- One row per level: level/action/responsible person/deadline;
- The scenario differences inside the actions;
- The table is the skeleton of the workflow;
- No mapping table = the warning is not used.
How to write the mapping table: the action mapping table must be specific to "who, what, within how long", not a vague "be careful". One row per level, four columns: level, action (per scenario), responsible person, deadline. Blue example: the duty confirms communications, watches the radar trend, prepares the review tools, within 15 minutes. Orange example: suspend outdoor work at height, check the air-termination and earthing connections, notify the work crew to withdraw, within 10 minutes. Red example: stop all outdoor work, the personnel withdraw to the safe zone, the SPD/bonding on standby, the review started after the warning clears, within 5 minutes. Write the actions into the table, post them on site and enter them into the system — the three stay consistent. The mapping table has four columns: level/action/responsible person/deadline — actions specific to "who does what within how long", written into the table, posted on site and entered into the system, all three consistent.
Key insight: "The grading mapping is the skeleton of the workflow — blue for preparation, orange for stopping at height, red for stopping outdoor; every level with action/responsible person/deadline; avoiding 'I know but I don't know what to do'."
2. Step Two: The Scenario Differences
Step two: the same level, different actions across scenarios.
The outdoor-work scenario:
- Orange: suspend work at height;
- Red: stop all outdoor work;
- The personnel withdraw to the safe zone;
- The work permits linked.
The unmanned-station/far-point scenario:
- The unmanned station links automatically (remote off/load reduction);
- The dispersed points warn automatically;
- No personnel on site;
- The system handles it automatically.
The hazardous/flammable scenario:
- Warning means stopping hot work/loading;
- Stop the hazardous work before the storm;
- Stricter and earlier;
- Safety first.
The meaning of the scenario differences:
- The scenario decides the strictness of the actions;
- The same level, different scenarios, different handling;
- Safe zones/work zones distinguished;
- The actions follow the scenario.
How the scenario differences land: the scenario differences are not a second table but the applicable scenario marked in the action column. The outdoor-work scenario focuses on "people" — suspending work, withdrawing personnel, work permits linked, the actions around personnel safety. The unmanned-station scenario focuses on "systems" — remote off/load reduction automatically, no personnel needed, the actions around automatic handling. The hazardous-area scenario focuses on "stricter" — warning means stopping hot work/loading, responding one level earlier than normal scenarios, the actions around hazard control. The standard for a reasonable action: does it actually reduce the risk of that scenario. The scenario differences land in the action column — outdoor manages people, unmanned stations manage systems, hazardous areas stricter; an action is reasonable only if it reduces that scenario's risk.
Key insight: "The scenario decides the strictness — outdoor work pauses by level, unmanned stations link automatically, hazardous areas stricter and earlier; the actions follow the scenario, not 'one size fits all'."
3. Step Three: The Post-Warning SPD/Earthing Review Points
Step three: what to check after the storm.
The SPD review points:
- The SPD states of every stage (leakage/temperature/telemetry);
- The operation records (which stage discharged);
- Degradation found early (relating to KD-0161);
- The FS SPD monitor online.
The earthing review points:
- The earthing resistance/connection states;
- The bonding connections loose or not;
- Review the priority points after the storm (relating to KD-0190);
- The FR monitor online.
The review timing:
- Review immediately after the warning clears;
- The key points first after the storm;
- The high-current events must be checked;
- The results into the records.
The review order and judgment: the review goes "state first, then records, then linkage". Step one, the states — FS/ESM for the leakage, temperature and telemetry of every SPD stage (relating to KD-0162). Step two, the records — which stage took the main discharge, which path the current took (relating to the surge-record reading of KD-0128). Step three, the linkage — the earth resistance (FR online) and the bonding connections loose or not (relating to KD-0193). The standard for the results: an abnormal state or record means arranging replacement/rectification, not just recording. Review in three steps: states first (FS leakage/temperature), records next (which stage discharged), linkage last (FR earthing/bonding); anomalies must be rectified, not just recorded.
Key insight: "After the storm check the SPDs and earthing first — FS for the states/operation records, FR for the earthing resistance; degradation known early; review immediately after the warning clears and after high-current events."
4. Step Four: Roles, Deadlines and Notification Channels
Step four: who does it, how long, how to be notified.
The role design:
- Every level names its responsible person;
- The actions have owners;
- The review has an owner;
- Responsibility to the person.
The deadline design:
- Every level action states its deadline;
- The orange/red response deadlines short;
- The review deadline clear;
- Overdue prompts.
The notification channels:
- Graded notification (SMS/phone/screen);
- The responsible person notified first;
- The duty/safety officers in sync;
- Reliable, no omission.
The meaning of the loop:
- Roles + deadlines + channels, the three-piece set;
- Actions done by someone, within a deadline, notifiable;
- Overdue traceable;
- The warning truly lands.
The reliability design of the notification channels: the channels must be "graded + redundant + confirmed". Graded: blue SMS, orange SMS+phone, red SMS+phone+on-site sound/light. Redundant: the main channel (platform push) plus the backup (phone duty), the backup taking over when the main fails. Confirmed: the action confirmed on the platform after completion, overdue without confirmation escalates the notification. Three questions for reliable channels: can the responsible person always receive it (redundancy)? Do they know what to do after receiving (the action table)? Is there a record after doing it (confirmation)? All three "yes" means the channel is reliable. The three elements of the notification channels: graded (blue SMS/orange phone/red sound+light) + redundant (main and backup) + confirmed (overdue escalation) — all three questions "yes" means reliable.
Key insight: "The three-piece set of roles + deadlines + channels — every level action has a responsible person, a response deadline and reliable notification without omission; overdue traceable; the warning truly lands."
5. Step Five: The Warning—Action—Record Loop
Step five: record the process and review it.
What to record:
- The warning time/level;
- The actions/responsible persons/completion times;
- The review results (SPD/earthing);
- The anomalies and rectifications.
How to record:
- The system records the warnings and actions automatically;
- The review results entered manually/automatically;
- The records stay on the platform;
- The loop auditable.
How to review:
- Review every storm event;
- Whether the actions were timely and effective;
- Whether the found anomalies were rectified;
- The workflow continuously optimized.
Key insight: "The warning—action—record loop — warnings/actions/reviews all leave traces; review every storm, follow up the rectifications; the workflow runs smoother."
6. Product Implementation: From the Warning to the Loop
WeiWuLian products manage the lightning-warning loop:
- FG Lightning-Protection Intelligent Gateway: the graded warnings in, reliable channels;
- FS SPD Monitor: the SPD states reviewed online after the storm;
- FR Earth-Resistance Monitor: the earthing state reviewed online;
- The closed-loop workflow: level → action → responsible person → review → record.
The design principle in one sentence: "Blue for preparation, orange for stopping at height, red for stopping outdoor — FG brings the warnings in, FS/FR manage the reviews; level/action/responsible person/deadline/record all closed-loop; the warning goes from 'seen' to 'closed-loop'."
7. Common Workflow Misjudgments
- "Installed without a workflow": the warning only flashes on the screen. Result: nobody responds. Correct: map the grades to actions.
- "One-size-fits-all actions": ignoring the scenario differences. Result: not strict where it should be. Correct: set the actions per scenario.
- "No review after the storm": ignoring the SPDs/earthing. Result: degradation unknown. Correct: review after every warning.
- "No responsible person": ignoring the roles/deadlines. Result: nobody does the action. Correct: responsibility + deadline.
- "The process unrecorded": ignoring the review. Result: problems not rectified. Correct: records kept + review optimizing.
Scope and Limitations
This article gives the workflow design linking lightning early warning to work suspension and SPD inspection (grading mapping, scenario differences, review points, roles/deadlines/channels, closed-loop records), applicable to the warning workflows of outdoor work/unmanned stations/hazardous areas. The exact grading and requirements follow the on-site safety specifications and the manufacturers' data; this article explains only the workflow design logic and points. All cases are anonymized (a park, a wind farm) and do not refer to any specific customer.